Pages

Sunday 31 May 2015

Shining Moment

Hello Scrappy Chat peeps. Fiona here with you again to share my first creation using the latest kit "Rough and Ready". 

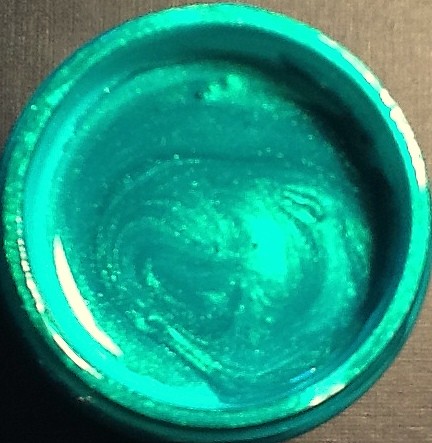
This kit includes the beautiful Silks Acrylic Glaze in the "Guatemalan Green". These silks are so delicious I could eat them! (I wouldn't suggest you do though). Their lustre is so beautiful and their coverage is amazing! It looks like a little pot but believe me they last a very long time.


I couldn't resist using them on my first layout. As soon as I opened the kit I was like "Oooooh yeah baby"!!
I wanted to show case this acrylic paint in all of it's glory, so I used the white card stock as my base. This colour on the white is STUNNING!


This lay out is of a very simplistic nature. There are really only three major elements to it. I've done this deliberately so each element stands out in it's own right. The first being the Silks Acrylic Glaze, the second being the silver leaf and the third being the journalling as this layout tells a story of my scrappy journey.

I have to admit I was really apprehensive about how to use the silver leaf. All I knew about this product was that it needed to be applied using something tacky. So I went looking for the tackiest thing I could find in my studio (no puns ok? yes I may have some puffy flower stickers or velour patterned paper hidden in their somewhere but I don't mean that kind of tacky!). Once I worked it out ...... it was a breeze to use! I'm really chuffed with the end result.


So shiny!!!

For a full technique sheet on how I created this layout, check out how to become a Scrappy Chat member below.

Thank you for dropping by.


Becoming a Scrappy Chat member has so many advantages!!

Kits are still $39 + Postage with LOADS of value for you money, as it is like doing 3 classes - all in the comfort of your own home + additional technique sheets for even more learning!


Each premier kit comes with:
Video AND  instructions to complete the three layouts
Feature a many techniques with product to be used well after the life of the kit.  (With all of our kits you will have plenty of product and knowledge to add to future projects)
Photos of each project including close up detail pictures
All the product needed to complete the project with a list of additional basic items used such as ink/ paints/gesso/texture paste and colour sprays you will need out of your supplies.
The kits focus on how to use various products teamed up with some pretty paper to compliment them, so there is always less or non-consumable products in our kits, to not only help you complete some beautiful projects, learn many techniques and ways of using the different product as well as taking them well beyond the kit projects.

Kits are $39 + postage and come out monthly
 please e-mail us at orders.scrappychatdesigns@gmail.com if you would like to order this kit


For more kits and other products visit our website www.scrappychatdesigns.com.au 


Scrappy Chat Designs Kit club Membership (e-mail us to purchase):

This lasts for 3 months is $135 and includes 3 kits at 5% off and postage for all 3 kits (they are released monthly).  As a member you also get ‘insider’ info on what is coming up in the next kit – sometimes even a pic! You get additional 'Technique sheets' showing you more techniques you can nail with the product in the kit from the talented Arty Chic's.  You are also guaranteed the kits which do sometimes sell out VERY quickly.  If you are interested in membership, you need to pay the membership fee by the 30th of the month prior.  
Just email for this deal orders.scrappychatdesigns@gmail.com

Wednesday 27 May 2015

Banners of fun by guest Amanda Hall

Hello again Scrappy Chatters.

It's Amanda back again and this time i'm going to do a quick step by step with my page from the current Scrappy Chat kit.


  • The first step is trimming down your white card stock to an A4 size  (or 12 x 8.5" which is what i work with) - or if you prefer to work with 12 x12 leave it as is and jiggle the other elements to fit.
  • Create 4 paper banners.
  1. narrow V shaped  bunting. (i used the teal dot paper for this)
  2. large scalloped bunting (i used the orange stripe paper)
  3. small scallop bunting (i used my scalloped punch  and the grey grid paper with this one.)
  4. a large uneven flag shaped bunting ( I used the blue hexagonal paper here)

shapes used for the banners
  • Tear a large corner triangular strip from the yellow dot paper.

  • Cut various wide strips from the yellow grid paper, make the blueprint type of paper (reverse of yellow grid) slightly larger to mat the yellow grid on top, the grey paper and a smaller strip from the cork. (the cork does not have to run full length - it is hidden under the photo so a smaller strip is only needed.)
  • Layer up the yellow grid and blueprint and adhere together so as they look matted. Notch ends.
  • Cut the end of the grey paper on a slant.
  • cut a V notch from the end of the cork.
  • Attach the yellow dotty torn strip to the top right corner and extend it along the top of the page.

TIP : YOU MAY WANT TO FIDDLE WITH PLACEMENT BEFORE ADHERING ANY BANNERS.

Slightly left of the middle of the page, running down the length of your page, position the two paper strips (blueprint and yellow grid counted as one and the grey paper as the other), and the cork. You will need to fiddle with your photo placement and vertical strips here, as the cork strip only needs to poke out the bottom of your photo. I used a 4x4" square photo. Poke the tops of the strips underneath the yellow dotty paper that is along the top of your page.


  • Layer up the banners. The large hexagon flag banner first, then the large orange scallop, then the smaller V pennant, and finally the smaller grid scallop. Make sure you can see some of each of the banners when layering. You may like to use some foam tape or glue dots to add dimension.

  • Position and these on top of the yellow dot paper at the very top of your page, ensuring that you can see the yellow dots peeking through and that it covers the start of your vertical strips (if they are visible)


  • Cut a strip 13cm x 1.5cm from the grey and cream stripe paper. Notch the ends in a V. Cut a similar strip, but slightly larger from the grey paper. Mount the stripe onto the grey. Fold the ends in on itself to form frog legs.

*demonstration only - not paper used and not yet mounted.
Top view (left), side view (right)

  • Adhere with foam tape along top of banners. Here is where you could add a speech bubble, date or sub- title onto this area. I have used one saying 'REAL LIFE'
  • I've also added a little leftover piece of Heidi Swapp pre-made banner in that area also. I love cutting those suckers up and using little bits here and there.
  • You can now adhere your photo (if you haven't already) and start working on your title. I used a orange 'seriously' arrow and from the cork supplied in the kit cut the word 'fabulous' using my silhouette. This was quite difficult to get a clean cut, and after many practises i found it needs to be on a slow setting and also quite a long blade depth. Backing the cork with clear sticky tape helped get a cleaner cut. The new Heidi Swapp die cuts for the cuttlebug would cut this cork like butter and have a beautiful clean finish. I ended up mounting my title onto white card stock to ensure it stood out.
  • On the bottom right corner i added a few random stickers in the colour palette, a cork heart, some thread, sequins and the little paint flecks (stuck with glue stick)

  • On the left of the photo i also added a few stickers, cork heart, and punched circles from the papers used. You could use this area for journalling if you would prefer.


And ta-da we are done! I'd love to see your own versions if you decide to do a layout like this! Happy crafting and thank you again for having me here at Scrappy Chat this month. I've really enjoyed creating with this kit and feel very honoured to have been asked to join in.


Becoming a Scrappy Chat member has so many advantages!!
Kits are still $39 + Postage with LOADS of value for you money, as it is like doing 3 classes - all in the comfort of your own home + additional technique sheets for even more learning!


Each premier kit comes with:
Video AND  instructions to complete the three layouts
Feature a many techniques with product to be used well after the life of the kit.  (With all of our kits you will have plenty of product and knowledge to add to future projects)
Photos of each project including close up detail pictures
All the product needed to complete the project with a list of additional basic items used such as ink/ paints/gesso/texture paste and colour sprays you will need out of your supplies.
The kits focus on how to use various products teamed up with some pretty paper to compliment them, so there is always less or non-consumable products in our kits, to not only help you complete some beautiful projects, learn many techniques and ways of using the different product as well as taking them well beyond the kit projects.

Kits are $39 + postage and come out monthly
 please e-mail us at orders.scrappychatdesigns@gmail.com if you would like to order this kit


For more kits and other products visit our website www.scrappychatdesigns.com.au 


Scrappy Chat Designs Kit club Membership (e-mail us to purchase):

This lasts for 3 months is $135 and includes 3 kits at 5% off and postage for all 3 kits (they are released monthly).  As a member you also get ‘insider’ info on what is coming up in the next kit – sometimes even a pic! You get additional 'Technique sheets' showing you more techniques you can nail with the product in the kit from the talented Arty Chic's.  You are also guaranteed the kits which do sometimes sell out VERY quickly.  If you are interested in membership, you need to pay the membership fee by the 30th of the month prior.  
Just email for this deal orders.scrappychatdesigns@gmail.com 


Thursday 21 May 2015

A share from Guest Designer Amanda Hall


A massive hello to all scrappy chatters!

I’m popping in to write about a favourite technique of mine… using JUMBO photos on a page. I do this most of the time by printing directly onto the background cardstock. For this month’s projects I actually did this technique twice, one on kraft and one on white cardstock. Any coloured cardstock can be used of course.


I fell in love with this technique many years ago, because the main focus is maintained on the most important part (the photo and the story) and as I am a minimalist scrapbooker, the small amount of left over space to decorate was not at all intimidating. It is now one of my ‘go to’ techniques as it’s so simple and can look so powerful.

The trick to printing on your cardstock is simply picking the right photo. I prefer to have some white space / negative space / blank space that allows one to embellish and have a title and journaling without squashing everything up and making it too crowded and overwhelming.. 

This photo for example would not work. There is not enough blank space to fit any memory keeping (title and journaling) or pretty it up. There is also no way for it to fit seamlessly onto an A4 sized print without it looking weirdly placed (ie. the heads would be cut off mid page).


The photo below would be a good one to use as the sky could be used to blend in the card stock.


This is the photo that I picked for the first layout. 


At the top of the photo there is a nice piece of sky which is easily altered to look as if it fades up and is a part of a whole A4 sheet. To do this I opened the photo in photo editing software (I use photoshop) and removed that pesky strip of land and then altered the levels until the sea was super white and bleached out. You may need to use an eraser tool, blending tool or the sponge tool to get the desired effect so as it looks naturally faded off into the background.


To print the image, I clicked print options and I positioned the photo at the bottom, as the photo lends itself to that positioning. Your photo may be looking in from the sides or from the top. It really depends where your white space is. A face peeking in from the side would be an awesome page!


In the second layout on kraft, I chose a photo that again could be printed large onto cardstock but needed to be mindful that my daughter’s head was half out of the shot. Whatever happened I needed to ensure the photo was placed to the left. As this photo was conveniently taken against a white wall, there wasn’t a lot of editing to do prior to printing.


In both the images I have changed the tone to black and white but of course you don’t have to. In an upcoming Kraft Plus challenge I use a colour photo and I was so pleased with the end result.

Becoming a Scrappy Chat member has so many advantages!!
Kits are still $39 + Postage with LOADS of value for you money, as it is like doing 3 classes - all in the comfort of your own home + additional technique sheets for even more learning!


Each premier kit comes with:
Video AND  instructions to complete the three layouts
Feature a many techniques with product to be used well after the life of the kit.  (With all of our kits you will have plenty of product and knowledge to add to future projects)
Photos of each project including close up detail pictures
All the product needed to complete the project with a list of additional basic items used such as ink/ paints/gesso/texture paste and colour sprays you will need out of your supplies.
The kits focus on how to use various products teamed up with some pretty paper to compliment them, so there is always less or non-consumable products in our kits, to not only help you complete some beautiful projects, learn many techniques and ways of using the different product as well as taking them well beyond the kit projects.

Kits are $39 + postage and come out monthly
 please e-mail us at orders.scrappychatdesigns@gmail.com if you would like to order this kit


For more kits and other products visit our website www.scrappychatdesigns.com.au 


Scrappy Chat Designs Kit club Membership (e-mail us to purchase):

This lasts for 3 months is $135 and includes 3 kits at 5% off and postage for all 3 kits (they are released monthly).  As a member you also get ‘insider’ info on what is coming up in the next kit – sometimes even a pic! You get additional 'Technique sheets' showing you more techniques you can nail with the product in the kit from the talented Arty Chic's.  You are also guaranteed the kits which do sometimes sell out VERY quickly.  If you are interested in membership, you need to pay the membership fee by the 30th of the month prior.  
Just email for this deal orders.scrappychatdesigns@gmail.com 


Tuesday 19 May 2015

Happy Snapshot and a sad farewell

 
Well, sadly,  as Beck has already mentioned in her post below, this will be my last blog post for Scrappy Chat Designs.  :(

I loved playing with the Home Grown Kit.
And as you have already seen by all the layouts from the DT (and wait until you see what the Guest Designer Amanda Hall has in store for you! wow!)
oops.. I digress.
Well as you have already seen by what the other girls have created, this kit is very versatile.


For my last layout.. Happy Snapshot, I created a VERY quick and simple layout.
I found an old Kaisercraft stamp that I have been wanting to use for ages and simply stamped the background with black ink.
Added a few paint "splats" (another Kaiser stamp from an earlier SCD kit) using white ink.

And then I simply added layers of the kits paper, that yummy cork sheet and the Jillibean Soup Kraft Tape in the kit.


A sprinkling of stars and fragments by  Stampendous  and the layout is complete!
As I said .. quick and simple.. it is amazing how much depth a simple stamped background can create on your layout.. why not give it a go?
 
So now it comes to the time to say goodbye.
I am leaving for personal reasons.. Life is just getting in the way (I'm sure most of you can relate :) )

I would firstly like to say THANK YOU to Beck for having the faith in me to include me in her amazing team.
I LOVE the kits and I have learn't so  much in my time with Scrappy Chat Designs.
Not only have I learn't by pushing myself trying to come up with different ideas and techniques to use with the kit products.. but also from each and every wonderful Arty Chic on the SCD DT team.
I leave the Scrappy Chat team all the richer for knowing these wonderful girls.
Behind the scenes these girls are amazingly supportive, funny and just downright gorgeous.
We have laughed together, cried together and driven each other mad with the constant "pinging" of the FB messenger notifications ;-)
I know that we shall remain firm friends.. and for that I will remain so thankful to Beck, Heather, Fiona, Renee and Kim. Love you girls xx
 

And also thank you to YOU.. the Scrappy Chat Members.
For all your kind words and for giving what we do a go!
It is always wonderful to get feedback from you all.

So, that's it from me for now.

Happy Scrapping,  and Take Care of You :-)

xx


Guest Designer Announcement and a sad goodbye

Hey there everyone, today I have a sad announcement as well as an exciting one.


It is with a heavy heart that I announce that the super talented Sandra Wallace is leaving the team.  She has been such an inspiration through all the fun she has created with the kits and a super chic to work with as well.  I have really enjoyed the opportunity to work with her again on this team and she is nothing short of awesome in so many ways.  Thanks Sandra for all the hard work, inspiration and amazing takes on each and every kit!

Sandra will be sharing her last project with us tonight and I'm sure you will all love it, so make sure you stop by to have a look!

Guest Designer for the month of April

I do get to announce something exciting though... I thought I would change  it up a little showing everyone just how versatile each and every kit is.  For this month's kit I asked the super talented Amanda Hall to have some fun with it.  Amanda's work is so lovely and clean always fresh and inspiring.  I love how she uses super strong design elements to capture attention to her pages and story.

Here is a little about Amanda:


My name is Amanda Hall and I live in a rural town in South Australia with my husband who is a farmer and my 3 daughters. I have been scrapbooking for nearly 11 years and am passionate about documenting everyday life. 

I love how scrapbooking makes us record all the little everyday details that otherwise would be easily forgotten and believe the imperfect moments and photos are as equally important to scrapbook as the perfect ones. 

I like to maintain the importance of the story, rather than being product focused. My scrap style is minimalist, using few products and maintaining the white space on a page. I like my layouts to be balanced and have a clean, non fussy appearance.

I have been fortunate to have had my pages published in For Keeps Magazine, Scrapbook Creations, Scrapbooking Memories, Australian Cards, Stamping and Paper crafts, Scrapbook Trends, Scrapbook Magazine UK and Creating Keepsakes. I was honoured to be a Scrapbooking Memories Master in 2008. I am also very proud to be a part of the Jot Magazine Creative Team as well as working on K+, the new kraft challenge site. In between work as a Registered Nurse and being a mum, I am also a co-organiser of our local and only SA based retreat - escape2create.

My (neglected) blog can be found here : 

Please take a minute to say goodbye and hello to these talented ladies
xxxBeck

Sunday 17 May 2015

Spend Time With Your Arty Chic Friends and Laugh

Hello again Scrappy Chat Friends.

My turn to share with you my layout using the new
Home Grown Kit
 
 
*Removed for Publication+
 
I had a bit of fun creating the background and some flowers and some Stampendous Fragment dots for this one.

 
I have created a Tech Sheet.. available to all Scrappy Chat members ... on how I created the background and the flowers.

Becoming a Scrappy Chat member has so many advantages!!
Kits are still $39 + Postage with LOADS of value for you money, as it is like doing 3 classes - all in the comfort of your own home!


Each premier kit comes with:
Video AND  instructions to complete the three layouts
Feature a many techniques with product to be used well after the life of the kit.  (With all of our kits you will have plenty of product and knowledge to add to future projects)
Photos of each project including close up detail pictures
All the product needed to complete the project with a list of additional basic items used such as ink/ paints/gesso/texture paste and colour sprays you will need out of your supplies.
The kits focus on how to use various products teamed up with some pretty paper to compliment them, so there is always less or non-consumable products in our kits, to not only help you complete some beautiful projects, learn many techniques and ways of using the different product as well as taking them well beyond the kit projects.

Kits are $39 + postage and come out monthly
 please e-mail us at orders.scrappychatdesigns@gmail.com if you would like to order this kit


For more kits and other products visit our website www.scrappychatdesigns.com.au 


Scrappy Chat Designs Kit club Membership (e-mail us to purchase):


This lasts for 3 months is $135 and includes 3 kits at 5% off and postage for all 3 kits (they are released monthly).  As a member you also get ‘insider’ info on what is coming up in the next kit – sometimes even a pic! You get additional 'Technique sheets' showing you more techniques you can nail with the product in the kit from the talented Arty Chic's.  You are also guaranteed the kits which do sometimes sell out VERY quickly.  If you are interested in membership, you need to pay the membership fee by the 30th of the month prior.  
Just email for this deal orders.scrappychatdesigns@gmail.com 


That's it from me for now... I will be back soon with another layout using the fantastic
"HOME GROWN" kit


Sunday 3 May 2015

A Little Home Grown

Hello scrappers. It's Heather back with you today.

I've been playing again! I have the latest Scrappy Chat Designs kit here and I have had so much fun with this. The kit is called "Home Grown" and has a fabulous combination of papers and products.

Here's what I made:


Those green speckles are Stampendous Fragments. They're kind of like eggshell pieces and they are sooo cool! I love the way we always get surprises like this in the kits.

If you're a Scrappy Chat Designs member, you will receive a Tech Sheet on how to make this project.


Kits are still $39 + Postage with LOADS of value for you money, as it is like doing 3 classes - all in the comfort of your own home!

Each premier kit comes with:
Video AND  instructions to complete the three layouts
Feature a many techniques with product to be used well after the life of the kit.  (With all of our kits you will have plenty of product and knowledge to add to future projects)
Photos of each project including close up detail pictures
All the product needed to complete the project with a list of additional basic items used such as ink/ paints/gesso/texture paste and colour sprays you will need out of your supplies.
The kits focus on how to use various products teamed up with some pretty paper to compliment them, so there is always less or non-consumable products in our kits, to not only help you complete some beautiful projects, learn many techniques and ways of using the different product as well as taking them well beyond the kit projects.

Kits are $39 + postage and come out monthly
 please e-mail us at orders.scrappychatdesigns@gmail.com if you would like to order this kit


For more kits and other products visit our website www.scrappychatdesigns.com.au 

Scrappy Chat Designs Kit club Membership (e-mail us to purchase):

This lasts for 3 months is $135 and includes 3 kits at 5% off and postage for all 3 kits (they are released monthly).  As a member you also get ‘insider’ info on what is coming up in the next kit – sometimes even a pic! You get additional 'Technique sheets' showing you more techniques you can nail with the product in the kit from the talented Arty Chic's.  You are also guaranteed the kits which do sometimes sell out VERY quickly.  If you are interested in membership, you need to pay the membership fee by the 30th of the month prior.  
Just email for this deal orders.scrappychatdesigns@gmail.com 


Happy scrappin'!

Heather