Pages

Showing posts with label irRESISTibles spray. Show all posts

Sunday, 11 May 2014

Love this Shot!

*This layout has been removed for publication*

Hi everyone!!
Sandra here with my share of what I created using April's "Picture Perfect Today" Kit.
I thought I might share with you how I created those yummy textured dots on my background using
TINBY DESIGNS  METALLIC MELTS and also how to make your own "enamel" dots using the iRESISTible spray .. BOTH of which come with the kit.

Firstly I gathered these few things


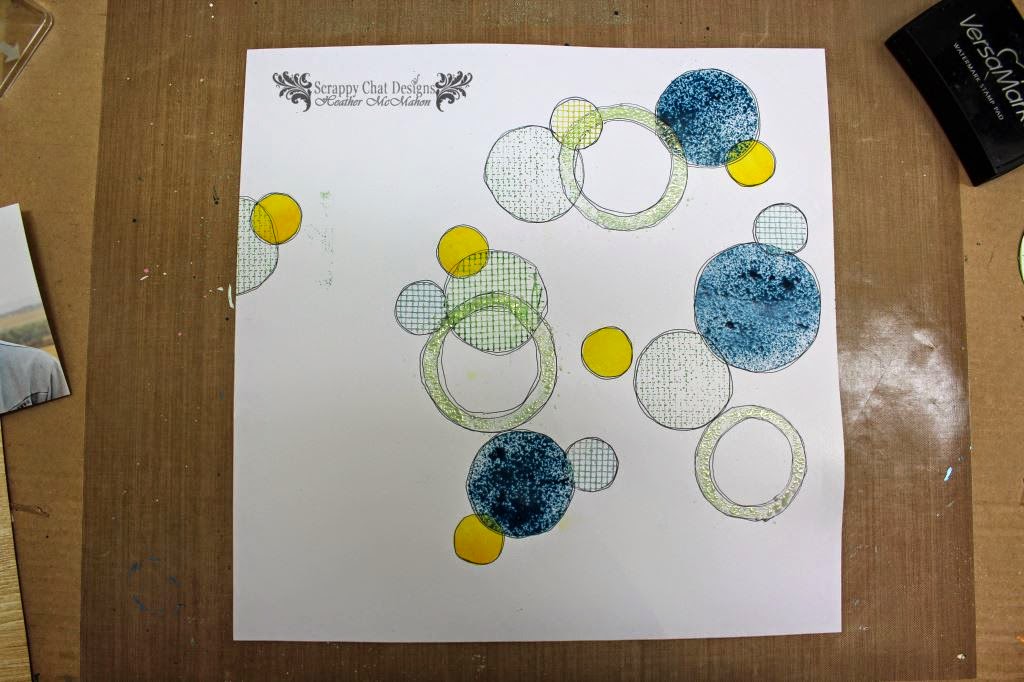
I used the Filter Tips as a stamp.
(I think this is where I should put in a health warning about the damage that smoking can cause to your and your families health.. but hey.. no harm in using them as stamps is there?? :-) )

First load up your tip using the VersaMark


Then stamp on  your layout


Liberally sprinkle with TINBY DESIGNS METALLIC MELTS


Tip the residue back into your container to use again another time.


Melt your dots using your heat gun


On the photo you can see where I accidently (love happy accidents) sprinkled some of the MELTS onto the plasterers tape .. LOVE the effect it gave.. (putting THAT in my memory banks for later. ;-) )


To create the "enamel" dots I simply "plopped" drops of the irRESISTibles onto the layout.
if you allow it to drop onto the page it creates a domed affect.. if you touch the end onto the paper you achieve a flat affect.

Allow the dots to air dry.. if you are impatient like me you will find that all that happens is that it starts to "snap crackle and pop" and you don't get the enamel dot affect.

I also sprayed the irRESISTibles onto the background to create more texture.

LOVE playing with both the MELTS and the irRESISTibles.. and I know you will too!


Thank for stopping by

If you do use one of the fantastic Scrappy Chat Designs kits why not share it with us on the Scrappy Chat designs facebook page ( the link is up the top there on the right) or right here in a comment??
We would LOVE to see it!
So leave us a link and we'll pop around and say hello!

Until next time
Sandra
x


Thursday, 8 May 2014

Brothers Exploring

Hi There Scrappy Chat Friends,

It's Renee here, to share with you a layout I have made using the April Kit.

This is my third layout, out of 3 that I have made using this super trendy kit!!

I always love an opportunity to scrap a layout of my beautiful boys!


I wanted to share with you a couple of the techniques and layers on how I put this layout together.

Step 1. I used the white cardstock from the kit.
I then grabbed the Irresistibles spray and a tray (you can use a small plate) and a cheap nail brush.


Step 2. I knew approximately where all the paper was situated on the layout as I had layered the paper before the first step.  I made a bracket with a pencil, so I knew where the papers were sitting.

I then sprayed the Irresistibiles onto a plate.
I dipped the nail brush into the spray, and made the following pattern.


Step 3. Using the Crafters Workshop Template from the kit, I also added that pattern with green ink.

Then using some stamps from previous Scrappy Chat Designs kits, I added in some various colored
blue inks.  Here is how it turned out.


Step 4.  Then I just added my paper stack and photo.

Step 5.  Add the chipboard fencing wire.

Step 6. Add some of the gridding from the kit to the top left and bottom right of the photo.

Step 7.  Add some sprayed gridding to the left and right of the page.

Step 8.  I added a little wound up navy blue cotton (found it in my sewing kit).

Step 9. Add your title and then journal.

And you are done!!!!
A very simple layout.

Here are a couple of close-ups.


I had a massive amount of fun with this layout and I was super happy with how it turned out.

You can see how fantastic the kits are, as we have all made very different layouts,
in a range of colours.

Thanks for stopping in.
And don't forget to check back on Sunday night, when the very talented
Sandra Wallace shares another layout with you.


Sunday, 27 April 2014

It's All About The Techniques.

Hi! It's Heather here. I hope you had a wonderful long weekend.

Today I'd like to share a post that's all about techniques. I'm using the April Scrappy Chat Designs kit. This page is a little less embellished than I would normally create, however I wanted to clearly show you the different techniques that you can use with this kit. I didn't want to hide the techniques with embellishments!

Firstly, my layout:


Now I'll show you all the different techniques I used to make that background.

1. Use a circle cutter to cut three circles in an old piece of paper.

2. Place the paper over your background cardstock and spray the irRESISTibles spray through the circles.

3. Your background should now look like this.

4. Trace a circle onto your plasters tape and cut it out. Use the self adhesive backing to stick it to a stamping block. Now use this as a stamp to add textural circles to your background.

5. Punch circles in scrap paper and apply ink through these circles onto your background.

6. Make smaller mesh circles by punching them out. Use these as stamps again but also add the coloured, punched circles directly to the page.

7. Cut circular shapes so that one fits inside another with a bit of space between. Sit them on your background so the new circles overlap parts of others. Attach with temporary adhesive it it helps. Apply clear VersaMark ink then add Tinby Metallic Melts. Remove the papers and heat the Melts.

8. The result should be something like this.

9. I then roughly outlined all the circular elements twice with a black pen.

I then added a title and fussy cut a few images from the papers to use as embellishments. I also use ink through one of the patterns on the stencil to create the border.

A few close ups of the finished layout:


Heather