Pages

Showing posts with label Metallic Melts. Show all posts

Tuesday, 7 February 2017

My Blessings with Kim


Hello and welcome back to the Scrappy Chat Designs Blog!

The latest kit from Scrappy Chat Designs is a total stunner & I am sure you will love everything!
The Lucky Charm kit....is full of gorgeous Prima papers, cardstock, Dusty Pink Color Crush, Metallic Melts, drawing ink, word stickers, (and a whole lot more).

Time to show you my first layout.....

[My Blessings]
 So in love with this Prima paper range......teamed with the Dusty Pink Color Crush & Metallic Melts...you can't go wrong!


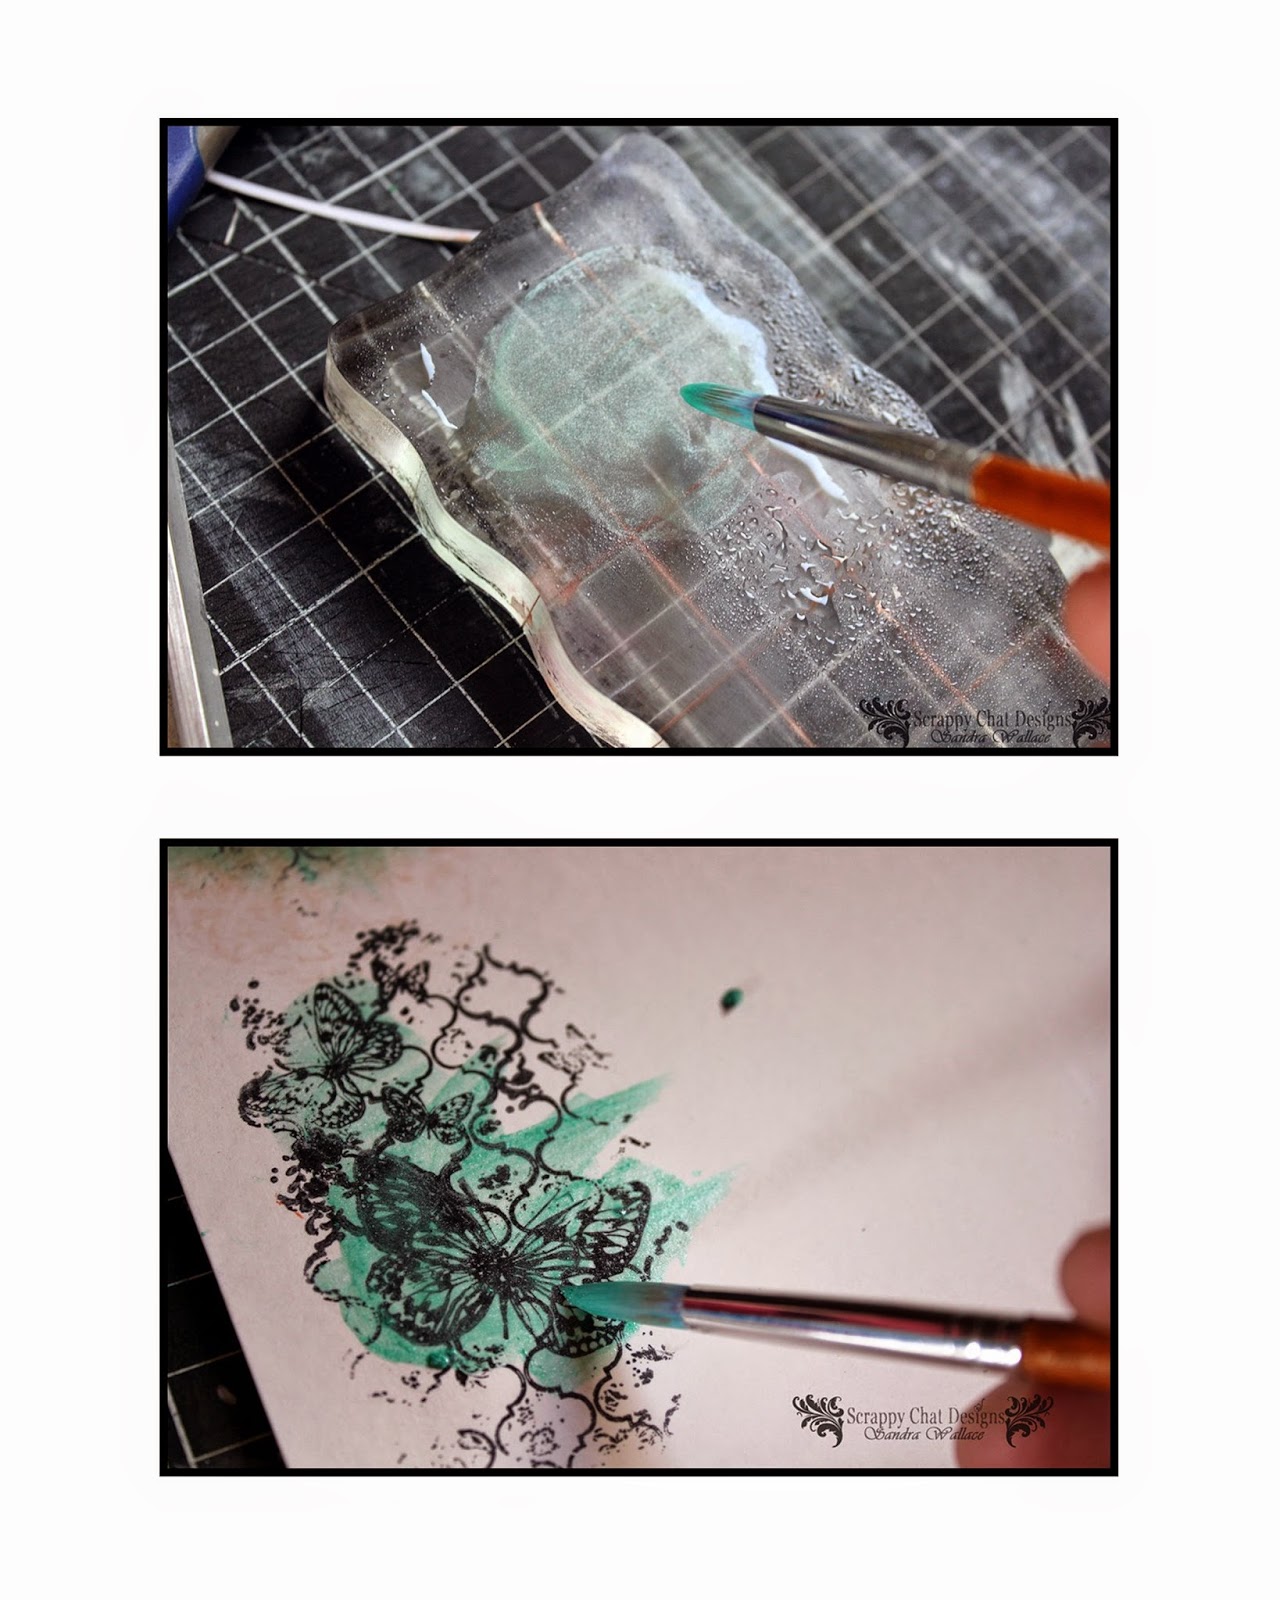
Scrappy Chat members will receive a Tech Sheet with step-by-step instructions showing how to make this page. Are you a Scrappy Chat member yet? If not, here are the details:

Joining Scrappy Chat Designs is like doing 3 classes each month - all in the comfort of your own home!

Each premier kit comes with:
  • Videos and full instructions to complete the three featured layouts while showing you many techniques with products that you can use well after the life of the kit. (With all of our kits you will receive plenty of product and knowledge that you can apply to future projects.)
  • Photos of each project including close up detailed pictures.
  • All the product needed to complete the projects with a list of additional basic items used such as paints, texture paste or sprays you may need from your supplies.
The kits focus on how to use a range of products and teams them up with sensational papers to compliment them. There are always less- or non-consumable products in our kits that you can use for a long time afterwards.

Membership can be purchased in 3 or 6 kit memberships.  Click on the memberships in the side bar to get yours today.

Kit individually is $45 + postage Australia wide.  Head HERE to get your kit

For more kits and other products visit www.scrappychatdesigns.com.au


 Kim Ewins

Thursday, 2 February 2017

A Charming Tea Party- Lucky Charm Kit.

Hi, Scrappy Chat Designs friends! It's Sandi here to share with you 

my 'A Charming Tea Party' using this month’s stunning 

Lucky Charmkit.


Using the rustic papers and arrow complimented this unique photo of a old stairwell area with teapots as flowerpots. 
I enjoyed working with the 'Lucky Charm' paper as the kit contains the opportunity to explore a range of styles and techniques using the feminine or rustic combinations of papers as well as experimenting with these wonderful watercolour powder and the magnificent metallic melts.


Are you a Scrappy Chat Designs member yet?  Our members receive videos, tips and tech sheets similar to this little technique every month.

If you want more of this then ...........


Here is how you can join!

Joining Scrappy Chat Designs is like doing 3 classes each month - all in the comfort of your own home!

Each premier kit comes with:
Video AND instructions to complete the three layouts and feature many techniques with product to be used well after the life of the kit. (With all of our kits you will have plenty of product and knowledge to add to future projects)
Photos of each project including close up detail pictures.
All the product needed to complete the project with a list of additional basic items used such as ink/ paints/gesso/texture paste and colour sprays you will need out of your supplies.
The kits focus on how to use various products teamed up with some pretty paper to compliment them, so there is always less or non-consumable products in our kits, to not only help you complete some beautiful projects, learn many techniques and ways of using the different product as well as taking them well beyond the kit projects.


Membership can be purchased in 3 or 6 kit memberships.  Click on the memberships in the side bar to get yours today.

Kit individually is $45 + postage Australia wide.  Head HERE to get your kit

For more kits and other products visit www.scrappychatdesigns.com.au

This lasts for 3 months is $149 and includes 3 kits at OVER 10% off!!! and postage for all 3 kits  INCLUDED (they are released monthly).  As a member you also get ‘insider’ info on what is coming up in the next kit – sometimes even a pic! You get additional 'Technique sheets' showing you more techniques you can nail with the product in the kit from the talented Arty Chic's.  You are also guaranteed the kits which do sometimes sell out VERY quickly.  If you are interested in membership, you need to pay the membership fee by the 30th of the month prior.  So to commence in February (next kit to be released) you need to have your membership fee paid by 30th January. Just email for this deal orders.scrappychatdesigns@gmail.com 

Just email for this deal orders.scrappychatdesigns@gmail.com

Thursday, 23 October 2014

Swing!


Hello! Sandra here again.


Love it when we get to share with you what we create with the new ScrappyChat Designs kits. This month it is my turn to share with you three layouts I have created with the new Charming Kit.
This kit is chockablock FULL of goodness. It truly caters for every style.
Gorgeous papers, stickers, alphas, DecoArt Shimmer Mister, doily, sequins.. etc etc ;-)
AND
X-Press It Sticky Barc!

Before I share my first layout, I would like to share with you a couple of things I learned when I first started playing with this stuff.
The Sticky Barc is REAL wood.. it is a very fine layer,  but it is real wood. With wood grain. I learned that the hard way.
My first thought was.. ooohhh.. wooden flowers!!
ba bouw --- wrong.
(that was supposed to sound like the depressing “wrong” sound from a game show.)
The Sticky Barc is very strong willed, so when I tried to turn these gorgeous die cuts from Spellbinders into blooms it didn’t work, they kept on unwinding.
*sigh

(if anyone knows the trick to this please share with us!! ;-) )
So...Hmmmm.... what next?
Aha!! A faux bow!
So I cut out a couple of ovals and also some rectangles and .....
Ba Bauw.... another mistake!
I forgot that the Sticky Barc has woodgrain, and I had mistakenly cut it out wrong, so that when I tried to fold the oval in half to make the “bow” it went against the grain and it snapped.
*sigh
Can you see how I have cut it wrong?? You will have to look very carefully.


hmmm.... well.. I will just cut it so that when I fold it, I fold it WITH the grain....


and then staple them together.. making sure not to crease the folded end.
I embossed one of the wooden circles that come in the kit with
 Beck BT Tinby Designs Metallic Melts in 
Gold Nugget (you can purchase it in the online store)
I then assembled the bow.
By first stapling the folded oval to the base.. like this
(it looks a bit rough huh?)


and then repeated with the other oval and base.
And then I peeled back the adhesive backing (cool!! ) from the base ...


and stuck it onto the layout with the gold embossed circle as the centre.
 I then assembled the layout.. using the DecoArt Shimmer Mister and the same Beck BT Tinby Designs Metallic Melts and some ink and a stencil to create the background. And (finally!) here is the finished layout....


If you would like more information about this kit or to order any of the Beck BT Tinby Designs Metallic Melts, check out the website here.   We also have a kit club membership which lasts for 3 months and you are guaranteed not to miss out on kits as they are released, e-mail orders.scrappychatdesigns@gmail.com for all the info.  Don't forget aside from all the yummy products, you get three instructional videos, written instructions, photos of each layout (including detail photos) with each kit!


Thursday, 11 September 2014

Loolabelle


Hello! Sandra here again with my last layout of three using the gorgeous Seabreeze kit.
Now, I have to be honest here. I struggle with the colour purple and I must admit to thinking.. EEEK!! purple!! when I saw the purple cardstock and the lavender re-inker.
But as one of the girls has already said.. the inclusion was a stroke of genius by Beck.
It took me out of my comfort zone.. making be think hard and then I just decided to PLAY with it.
And now I just love the neutral, aqua and purple colour combo.
I was inspired to create a different background after watching a video tutorial by
 Donna Mays AKA
The One Minute Muse.

All you need is string and ink.!!

The link to the video is here.. and seriously.. the video is only one minute long! love it!

string technique video
 
And this is the background I achieved.
Different and unique.


I then created the layout, using remaining strips of paper. I created my own flowers which I lightly enhanced with the Tinby Metallic Melts that comes in the kit.
Using the lavender ink I altered some generic white flowers to purple flowers.. (easy.. just dip them in! mind you they do take a while to dry. ;-) )
 
Don't you just LOVE the butterfly that is in the kit? Divine.

Using the Tinby Metallic Melts I created a "patina" affect.


I love the end result. Proving that Tinby Metallic Melts can be used on anything!

Loving all the different layouts created by the DT  from the one kit..
showing how versatile
 Scrappy Chat Designs kits are.
They really do cater for all different styles of scrapping.

Until next time!


Thursday, 4 September 2014

Captain Seaweed

Hello again!!
Another share with you using the fabulous Sea Breeze kit.


This is a layout of my son on our boat...and Captain Seaweed?? Well that is the name his dad calls him out on the water. :-)

For this layout I used the chipboard pieces as stamps to create a bit of interest to the background paper.

and then, when I had finished using them as stamps, I embossed inked them gold and then embossed them with the Tinby Metallic Melts.


 I loved the affect it gave.
I added a bit of pumpkin Tinby melts as well to give it a brassy hue.

To create the embossed dots I used THIS technique I used on a previous layout


I also added a little peek a boo tear and tucked in the ships wheel.

LOVE how simply adding a bit of Tinby Metallic Melts gave texture to my layout.


Thursday, 7 August 2014

The Colours of Bali

Hi and welcome to my second post for this month's Scrappy Chat Designs kit. This kit features some gorgeous October Afternoon papers. To show how versatile these papers are I thought I'd make a page that is about as far from the usual October Afternoon feel as you can get. My page is about Bali!


It's always hard to show a double page online so here are plenty of close ups:


Aren't those Tinby Metallic Melts divine? If you're a member you'll get full instructions on how I made this.


I had so much fun playing with the stencil, Distress Stain and Metallic Melts from the kit on this one.

If you're a Scrappy Chat Designs member then you will be emailed instructions on how I made this. As a member you get heaps of info every month showing techniques, tips and hints as well as a minimum of three videos showing how to make the key three layouts from each kit. Contact orders.scrappychatdesigns.gmail.com.for more info.


Happy Scrappin'!

Heather

Sunday, 6 July 2014

Tickled Pink

Hi ho.

I've had a lot of fun working with the new kit from Scrappy Chat Designs. I've been very surprised with what I came up with for this one - because I opted to use the pink! I rarely scrap with pink and I'm so glad I did this time cos I love it!

Here's the layout:


Although I could have chosen from any of the colours in the kit, I really only ended up using three colours in this - teal, grey/silver and pink. I love how they go together so well. I never would have thought that pink would suit photos about the Australian bush but I've changed my mind now!

I cut down the large chipboard shape and used the silver Metallic Melts on it to make the framework under the photo.


Everything on this layout came with the kit, except for the string. There are an amazing three stamps in this kit and I used them all. They're my new faves!

If you're a Scrappy Chat Designs member then you will be emailed instructions on how I made the background and the butterfly stamped section and how I altered the letters. As a member you get heaps of info every month showing techniques, tips and hints as well as a minimum of three videos showing how to make the key three layouts from each kit. Contact orders.scrappychatdesigns.gmail.com.for more info.

Happy scrappin'!


Heather

Thursday, 19 June 2014

Dreams Imagined, 25yrs.

Hello
Sandra here again!
How awesome is the Dreams Imagined Kit?
I fell in love with it as soon as I opened my happy mail from Beck,  the colours are just divine.
For my first layout I went for quite a simple look.
I had some fun with the background and tried something a little different with the awesome piece of Twiddleybitz lattice chipboard


Here is how I created it.

Firstly I trimmed the grey cardstock to 29.5cm x29.5cm.
I cut out the centre of the IMAGINE paper and used this to matt the grey cardstock.

Using the Kaisercraft stamps I first randomly stamped the edges and the layout with white ink.
and then I repeated this with black ink.
I added some white, orange and aqua watered down water colours splats to add a bit of colour to the background... they look awesome against the grey!


Next I created the chipboard flower.
I painted the entire chipboard piece with white matte  spray paint.

(you can use which ever medium you like.. I am an impatient person and I find that spray paint gives great coverage and is also fast drying )
Then.....


1.       Cut out your 5 diamonds from the lattice (I only used 5 because I knew that the flower would be tucked under the photo.. but to make a complete flower cut out 6 diamonds.
   2.  Glue the diamonds onto the piece of Imagine paper that you cut out earlier.
3.  Fussy cut around the your flower.
4.  I found a plain white button in my stash and embossed it using the silver  TINBY METALLIC MELTS in the kit.
I then assembled the layout as seen in the photo.

To help the title stand out I outlined it with white gel pen


Next I created the butterflies.
I simply used the gorgeous butterfly stamp that is in the kit with  Staz on Ink and stamped it on the piece of white card in the kit.
then...

On an acrylic block I added some mint gelato and then sprayed it with water. I blended it with a paintbrush and then simply painted the stamped image, blotting any excess water with a baby wipe.
Then I fussy cut the butterflies and added them to my layout.


Added some journaling ...

And my layout is complete!


I hope you have fun creating with your new Dreams Imagined Kit.
And I do hope you share what YOU create with us over on the ScrappyChat Facebook page.
We love to see what the members create using the kits!


Thursday, 29 May 2014

My Handsome Son

Hi there,

It's Heather here with you today. I will tell you about my layout shortly but first you'll have to put up with me being a proud mum! My son looked so handsome in a suit when he got dressed up for the school formal. He had never worn a suit before. We borrowed it from a friend and it was a perfect fit. I know we girls sometimes like to look nice but it's good that the guys can too. My little boy really is growing up!

Ok, so now that I've got that off my chest I'll tell you about the layout! Here it is:


This is my second layout this month using Scrappy Chat Design's Cheeky Smiles Kit. I love this kit! If you are interested in seeing more techniques using this kit and others, have a think about becoming a Scrappy Chat Designs member. For inquiries email orders.scrappychatdesigns.gmail.com or take a look at the new website here.

I had to be fairly brave to tackle this design! I chose to use this paper as a background even though it's very busy. To mask the busyness, I just swiped black paint over parts of the page. I then cut heaps of frames from one of the other Simple Stories papers and used these on top of the black paint. Yes, I framed my photo with frames!


I sprayed some of the frames with the teal Tumble Dye. I love how these turned out.

The first part of my title is cut from the background paper. The chipboard words are made from the Kaisercraft letters in the kit. I painted them then coated them with Metallic Melts. On the word "school" I made a layer of the red then topped it with white to get a red outline. I kept changing my mind what colour I wanted on the word "formal". There are four different layers under there! I love the way I can just cover a colour with paint and the melts.


Heather
www.heathermcmahon09.blogspot.com.au